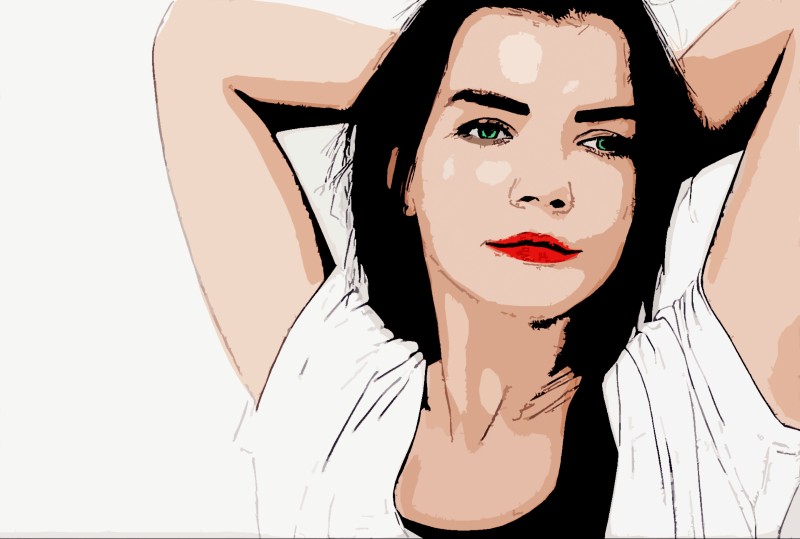
Photos to Vector Cartoon in Photoshop Without Pen Tool

In this photoshop photo effects tutorial, i will show you how to transform your photos into vector cartoon look in photoshop using native filters only. The most important thing I don’t use pen tool or any other selection techniques to create this effect.
Vector Cartoon portrait Effect Tutorial :
CLICK HERE TO WATCH TUTORIAL
First duplicate background image. Rename the layer to “photocopy”. convert layer to smart object.
Go to filter gallery, select photocopy filter. Keep detail: 2 and Darkness: 50.
Kindly note that these values may vary, based on size of your photos.
Click ok to apply changes.
Now duplicate background layer again and name it “Torn Edges”.
Move the layer to top. convert layer to smart object.
Go to filter gallery, select Torn edges filter. Keep image balance: 19 smoothness: 15 and contrast: 16.
Click ok to apply changes. Change the layer blending to MULTIPLY.
Duplicate background layer again and name it “Cut-Out”. Move the layer to top stack.
Now de-saturate the layer Shift+CTRL+U keyboard shortcut. Convert layer to smart object.
Go to filter gallery, select Cut-Out filter. Keep number of levels: 8, Edge simplicity:5 and Edge fidelity:3.
Click ok to apply changes.
Change the layer blending to MULTIPLY. Lower the layer opacity way down to 30%.
Go to filter menu, apply gaussian blur to soften the rough cutout.
Keep radius between 10-20px. click ok.
Now we need to color the skin, lips and eyes.
Go to adjustments and select “solid color”. Select any red tone for lips.
Change the layer blending to MULTIPLY.
Now right click on the color fill adjustment and choose blending options.
Drag the white triangles to the left to add depth to the highlights and shadows.
Hold Option or Alt Key clicking on the triangles splits them to feather the color blending.
Select color fill layer mask and invert it Ctrl+I. Now take soft brush and paint on lips with white color.
Similarly add color to skin, dress and eyes.
Now create a new layer from all the visible layers by pressing Ctrl+Shift+Alt+E.
Name layer to “stamp Copy”. convert layer to smart object.
Go to filer gallery, select “cutout” filter. Adjust number of levels, edge simplicity and fidelity to your liking.
click ok to apply changes.
Now go to adjustments and select color lookup to color tone your final image.
change color lookup blending to soft light to add contrast.
Final step, add new blank layer. Rename layer to “Spot Remove”.
Take spot healing brush tool, check sample all layers option. Simply paint on the unnecessary spot lines to erase it.
That’s it. We’re Done.

[sociallocker id=”1411″][download-attachments][/sociallocker]