How to Create Intense & Dramatic Portrait Effect in Photoshop

In this tutorial we’ll walk through how you can create an intense & dramatic portrait effect very easily in camera raw filter or even in lightroom. This effect will work very well with some portraits, especially when you want a rough or grungy feel photo effect.
For this tutorial, I used Adobe Photoshop Cc 2017 on Windows. However, this should work in most versions of Photoshop if u have ACR filer installed.
Intense & Dramatic Portrait Effect Tutorial :
Open the image you want to edit in Photoshop and duplicate it.
convert layer to smart object.
Now open image in camera raw filter.
go to the Basic settings in camera raw panel. We’ll adjust the settings as follows:
Exposure: +0.40
Contrast: +50
Highlights: -60
Shadows: +40
Whites: -50
Blacks: -40
With these changes we have increased the dynamic range with the changes to highlights and shadows,
we’ve set a strong black point by moving the blacks slider to the left, and we’ve given the image a lot of contrast.
Clarity: +90
Vibrance: +20
Saturation: -60
The major boost in clarity increases the midtone contrast, which gives a sharpened look.
The desaturation takes care of the issue in the previous step, and the desaturation helps to add to the intensity.
In the detail section apply the following settings.
Sharpening:
Amount: 30
Radius: 1.0
Detail: 100
Masking: 0
Noise Reduction:
Luminance: 30
Detail: 50
Contrast: 25
Color: 30
Detail: 30
Smoothness: 15
The last step is to add a vignette. Under Post Crop Vignetting change the amount to -20.
And we’re done! Here is the finished photograph. You can do same thing in lightroom software as well with exactly steps.
Now we can save these settings as a preset, and then apply the preset to other photos, that need the same effect or similar corrections.
choose Save Settings from the Camera Raw Settings menu.
The saved settings preset is now available in the Presets tab for any open photo.
Click OK when you’re done to close out of the Camera Raw Filter’s dialog box
Photoshop goes ahead and applies your settings to the image
Now try to apply this preset to other photos
Remember that the results may vary on different images. you can play around with exposure, contrast, highlights and shadows to get the photo effect!
Our channel subscribers can download preset from link below for free, and with just one-click we can add the effect to any photograph.
I hope that you enjoyed this tutorial
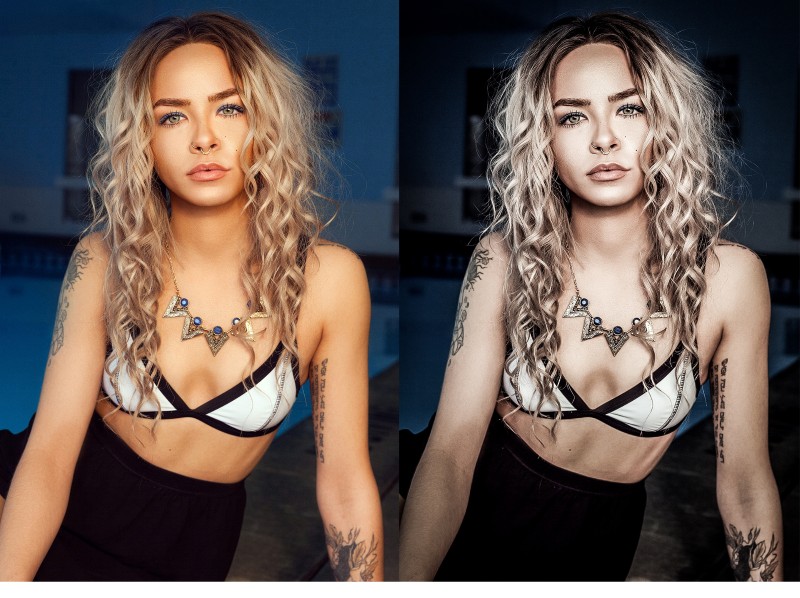
Before & after – How to Create Intense & Dramatic Portrait Effect in Photoshop
[sociallocker id=”1411″][download-attachments][/sociallocker]