How to Create Realistic Water Reflections with Ripples in photoshop

in this video i will show you how to make water reflections from scratch, with realistic reflections and ripples.
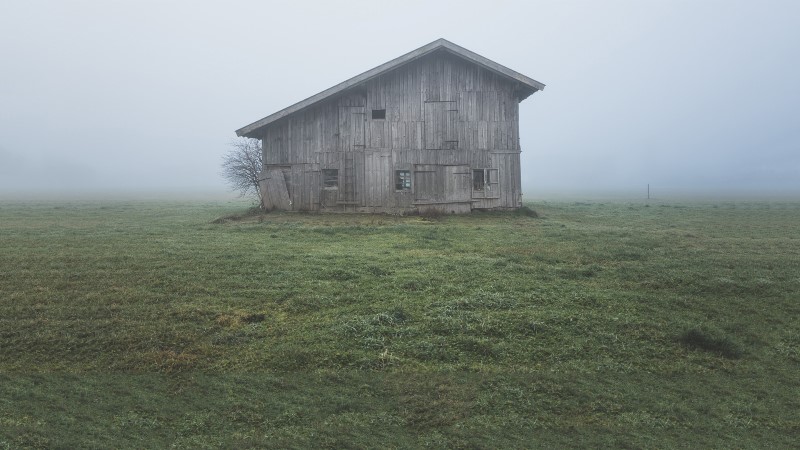
For this photoshop tutorial I’ve selected this barn photograph.
Step 1: Making the water reflection
First select marquee tool and click & drag to make some selection from photograph to make reflection. copy and paste it in new layer.
go to edit, transform and select scale. Flip it vertically, and place it, so it becomes a mirror image of the original photo.
i need to re-position the two layers to fit the height and width of the canvas well.
convert reflection layer to smart object, so we change any adjustments without destruction.
now we add blur to reflection. goto filter and select motion blur. keep angle 90 degree and distance 11 pixels. click OK.
Step 2: Make water ripples in photoshop
Open a new 600 x 1000 px RGB Photoshop document. size doesn’t matter but make sure it vertical size. keep background content black color.
now add noise to the layer. Go to Filter>Noise>Add Noise, and set the Amount to maximum. click OK.
Next go to Filter>Blur>Gaussian Blur, and set the Radius to smaller pixels.
Now go to your layers panel and switch to Channels. Click on the Red layer then go to Filter>Stylize>Emboss, and set the Angle to 180 with the Height at 1 and the Amount at maximum.
Do the same again with the Green layer selected, and the Angle set to 90. with the Height at 1 and the Amount at maximum
Next we want to stretch the lower part of the image outwards in order to give it the correct perspective.
Go to Edit>Transform>Perspective and pull the bottom corners outwards as far as you can.
You can observe the image looks like colorful ripple water waves. You can stretch the lower part more to get smooth wave effect.
Save this as a .psd with maximum compatibility and close it. This psd file works as displacement map to create ripples for our tutorial, name the file water ripples displace map for easy access
Step 3: Applying the Waves Ripples
now go Back in your original project file, Apply the Waves Ripples displace map to reflection layer
Go to Filter>Distort>Displace and a dialogue box appears. set the Horizontal Scale to 10, and the vertical scale to 40. Also select Stretch to Fit and Repeat Edge Pixels.
When you click okay you will be asked to find a displacement map and select displace map .psd image you made earlier.
if you want greater distortion simply click on filter again and change vertical scale.
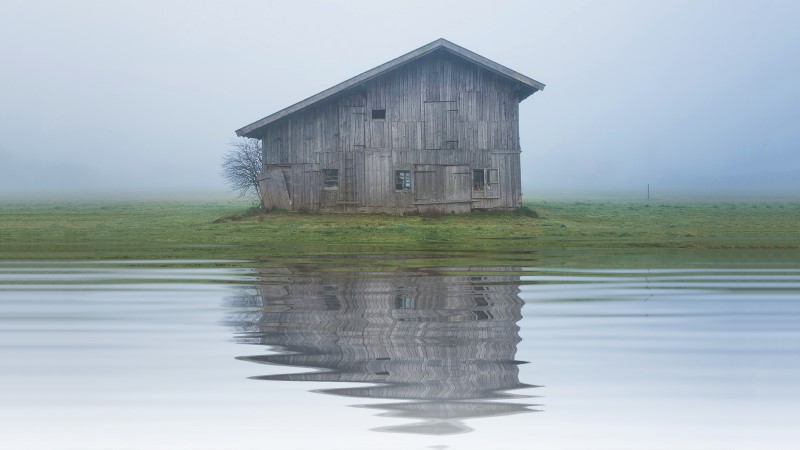
we successfully created a realistic water reflection effect.
Step 4: Final touches to create realistic water reflections
finally To finish off, we’ll make some small adjustments to the image as a whole. First we’ll darken the area where the water meets the land.
Add a new layer, and take gradient tool and select Reflected Gradient
keep foreground white and drag where the water meets the land.
invert the layer CTRL + I keyboard shortcut
Change the layer’s blending mode to multiply, and take it’s Opacity way down to smaller amount. .
Similarly add a little environment haze at the top of the reflection. in this image sky is whiter color so add white gradient
change layer blending mode to screen & reduce opacity
finally add vibrance adjustment layer and increase vibrance.
add gradient mask to make effect apply only to top part of the image, not on reflection
here is before & after photographs.
Hope you enjoy this photoshop tutorial on how to create realistic water reflections. please Subscribe below to download this tutorial PSD files
love u man for give the psd file of water ripples