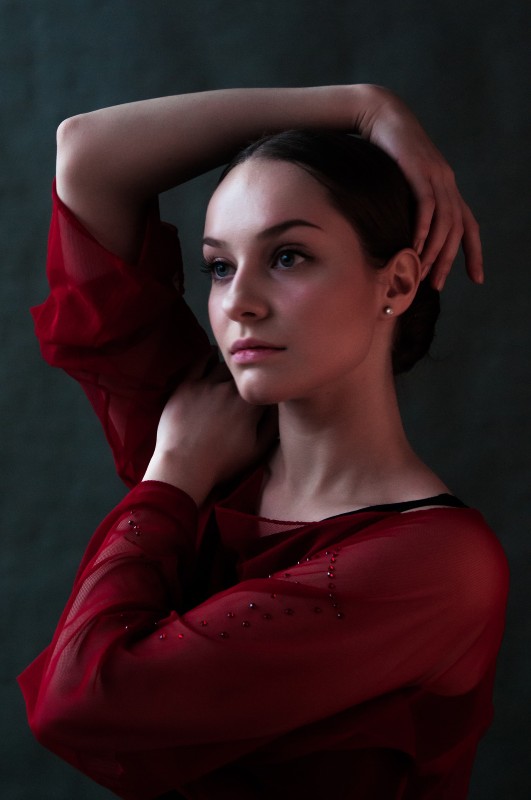
Neon Lighting Studio Effect in Photoshop – Dual Light Photography

In this photoshop photography photo effect tutorial, learn how to create neon dual lighting studio effect in photoshop.
Neon Lighting Studio Effect Tutorial :
CLICK HERE TO WATCH TUTORIAL
Step:1
First open photo in photoshop. For this tutorial i used
Nikon D300s camera
24.0-85.0 mm f/2.8-4.0
50.0mm · ƒ/4.5 · 1/50s · ISO 800
Step:2
Add Color fill adjustment layer (pick color of your choice), then change layer blending to “color dodge”.
Step:3
Add light on right hand side.
Select color fill layer mask, choose directional gradient and Click & drag on the mask to create light shades from outer corner to middle.
Step:4
Now add another light layers similarly repeating step 2 & 3.
But this time change blending modes to “overlay” & “soft light”.
Step:5
Now add light on left hand side (repeat steps 2,3 & 4).
Try experiment with different colors but complimentary colors looks best.
Step:6
This step is optional. Add yellow bright light on face for skin tone.
To do that add yellow color fill, change blending to soft light and apply radial gradient to the layer mask.
Final Step
Create a visible stamp copy layer (flattening layers without actually flattening) by pressing Command+Option+Shift+E or CTRL+Alt+Shift+E.
Then open layer in Camera raw filter, apply sharpening, noise reduction and vignetting.
That’s it. We’re done.

[sociallocker id=”1411″][download-attachments][/sociallocker]