How to Create Fake Long Exposure Photo in Photoshop

Fake Long Exposure Tutorial
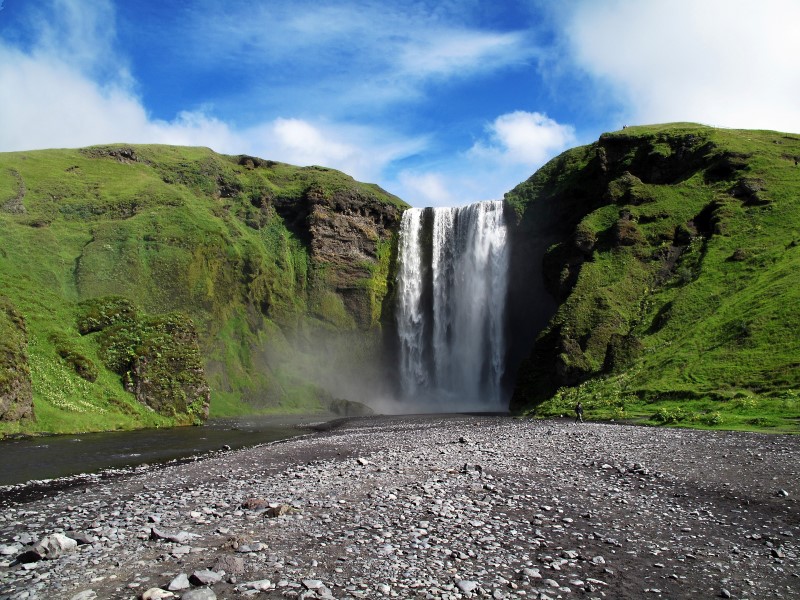
: In this Photoshop Long Exposure Effects tutorial, we’re going to look at how to give waterfalls a silky and clouds smooth appearance, as if the photo was taken with a longer exposure which would normally require the use of a neutral density filter & tripod.
Step : 1) First Draw A Selection Around The Sky. Copy the Selection Onto New Layer. Use the keyboard shortcut Ctrl+J (Win) / Command+J (Mac) to copy it onto its own layer above the Background layer.
Duplicate background layer and move to top. Now apply layer mask to hide the sky.
Step : 2) Apply The Motion Blur Filter To The sky Layer. The motion blur effect looks nice, but it needs a little cleaning up since the blur is extending outside the edges of the sky.
We can clean it up easily using a layer mask. Paint With Black On The Layer Mask To Clean Up The Blur Effect.
Now similarly we give waterfalls a silky smooth appearance, as if the photo was taken with a longer exposure use of a neutral density filter.
Step : 4) Draw A Selection Around The Waterfall.
With the waterfall selected, use the keyboard shortcut Ctrl+J (Win) / Command+J (Mac) to copy it onto its own layer above the Background layer.
selection doesn’t have to be surgically precise, but try not to stray too far from the edges of the waterfall.
Group all copied waterfall layers.
Step : 5) With our waterfall now copied to its own layer, we can create our “silky smooth” effect by applying the Motion Blur filter to it.
The motion blur effect looks nice, but it needs a little cleaning up since the blur is extending outside the edges of the waterfall.
We can clean it up easily using a layer mask. Paint With Black On The Layer Mask To Clean Up The Blur Effect
Step : 6) The water is rushing so quickly and powerfully over the edge that it’s not falling straight down.
We can’t create curved blurs with the Motion Blur filter, but use The Warp Tool To Curve The Blur Effect If Needed.
Drag any of the handles to create curves in the blur effect as needed.
Finally i will do post processing image in adobe camera raw
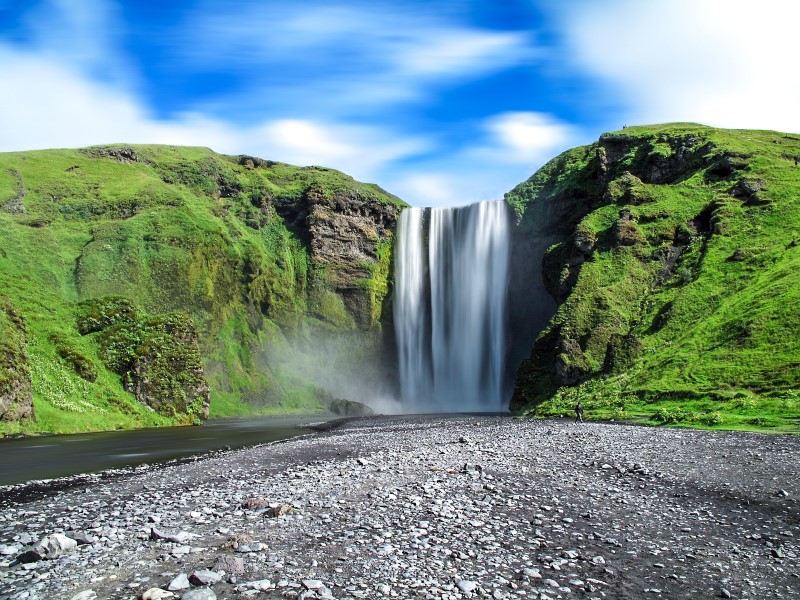
And here is my finished “silky smooth long-esposure” effect after adding a bit of a basic adjustments in camera raw
[sociallocker id=”1411″][download-attachments][/sociallocker]