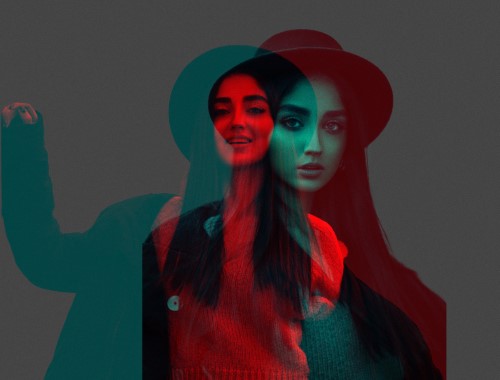
Double Color Exposure Effect-Photoshop Photography Tutorial

Today, I’m going to show you how to create an amazing double color exposure effect in Photoshop. It’s a fantastic way to add creativity and artistry to your photos, and it’s easier than you might think!
Create Double Color Exposure Effect – Photoshop Tutorial:
First, choose a photo to work with or use the sample photo provided. Use the “select and mask” tool to select the subject and output the selection as a layer mask. Now, experiment with colors by opening the layer blending options and choosing the ones that work best for you.
Next, import another photo and repeat the process. Use the transform tool to move and place the layer as desired, and expand the workspace with the crop tool to create a more focused composition.
To create the perfect background, add a solid color fill for it. You can change the color to gray or add a gradient to make it more unique.
Adjust highlights, shadows, and mid-tones using levels to achieve a balanced and visually-appealing composition. Add a touch of noise for a more organic feel, and use the hue/saturation adjustment layer to adjust the overall color and saturation.
All the layers created are non-destructive, giving you flexibility to experiment with different color combinations and effects until you achieve the perfect look.

►SUBSCRIBE to my YouTube Channel: CLICK HERE
►JOIN or Become YouTube Member for Direct Downloads: CLICK HERE
►Support Me on Patreon for Instant Downloads: CLICK HERE