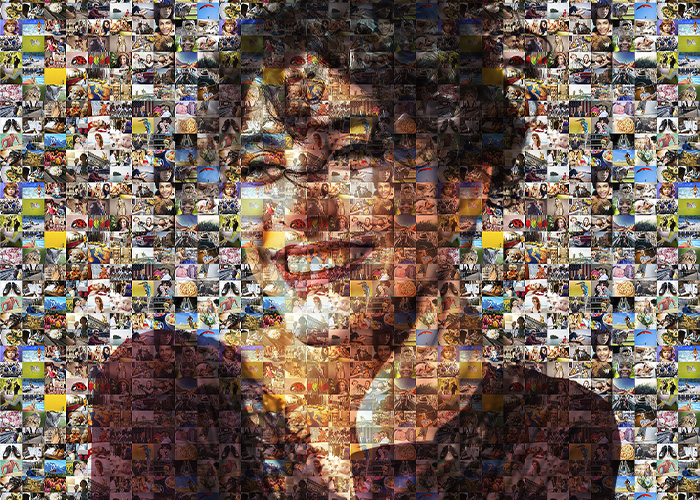
Create Mosaic Photo Effect in Photoshop!

Welcome back to another exciting Photoshop tutorial! In today’s video, I’ll show you how to create a stunning mosaic photo effect in Photoshop. Whether you’re curious about the mosaic effect or want to learn how to achieve it, you’ve come to the right place. Let’s dive right in!
How to Create Mosaic Photo Effect: Photoshop Tutorial:
1) Open your desired photo in Photoshop. If needed, separate the subject from the background using the Select and Mask tool.
2) Refine the selection using the “Refine Hair” option for intricate hair details.
3) Ensure “Decontaminate Colors” is checked for cleaner color separation, and set the output to “New Layer with Layer Mask.”
4) Now that the subject is isolated, let’s add the photos for the mosaic effect. Prepare a photo collage grid and take a screenshot on your iPhone or iPad.
5) Open the screenshot in Photoshop and go to Edit – Define Pattern. Give your pattern a name and click OK.
6) Close the tab and add a pattern fill layer. Select the pattern you created and scale it down to your preference.
7) Convert the pattern fill layer to a smart object and change the blending mode to overlay.
8) Add a Solid Color adjustment layer and choose a shade of gray for the background.
9) Apply sharpening to the pattern fill layer by going to Filter – Sharpen.
10) Duplicate the background copy layer and change its blending mode to Lighten. Lower the opacity by 50%.
11) Duplicate the background copy layer again, move it forward, and apply a Levels adjustment to darken it.
12) Adjust the shadows, midtones, and highlights in the Levels adjustment until you achieve the desired effect. Lower the opacity to your preference.
13) Rename the layers to “Lighten” and “Shadow” respectively.
14) Duplicate the pattern fill layer once more, move it forward, and change the blending mode to Soft Light. Lower the opacity to 25%.
15) Apply a Surface Blur to the background copy layer to give it a polished look. Go to Filter – Blur – Surface Blur and adjust the settings.
16) Group all the layers together to keep the workspace organized. Name the group “Mosaic Effect.”
Thank you for watching this tutorial! I hope you found it helpful in creating your own mosaic photo effect. Stay tuned for more exciting editing techniques and creative ideas in the future. Take care and happy editing!

►SUBSCRIBE to my YouTube Channel: CLICK HERE
►JOIN or Become YouTube Member for Direct Downloads: CLICK HERE
►Support Me on Patreon for Instant Downloads: CLICK HERE