Auto Blur Background – Power of Photoshop and AI

In this article, we’ll guide you through the steps to auto blur background in Photoshop and show you how to use this feature to create visually appealing images.
White Balance Trick in Photoshop Tutorial:
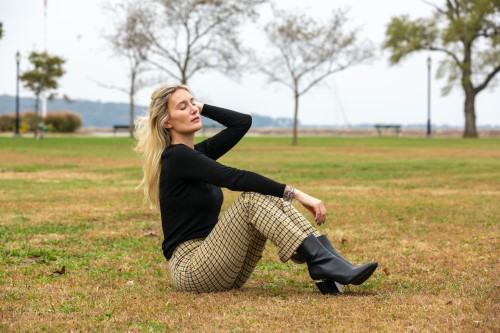
Step 1: Duplicate the Background Layer
To start, make a copy of the background layer. Right-click on the layer and select “Duplicate Layer.” This will create a new layer that you can use to apply the blur effect to.
Step 2: Go to Neural Filters
Next, go to “Filters” in the menu bar and select “Neural Filters.” This will open up a panel where you can access a variety of filters that are powered by artificial intelligence.
Step 3: Use the Depth Blur Filter
In the Neural Filters panel, scroll down to find the “Depth Blur” filter. The system will automatically detect the subject’s face and apply the filter. By default, the “Focus Subject” option is selected, which will blur the background and keep the subject in focus.
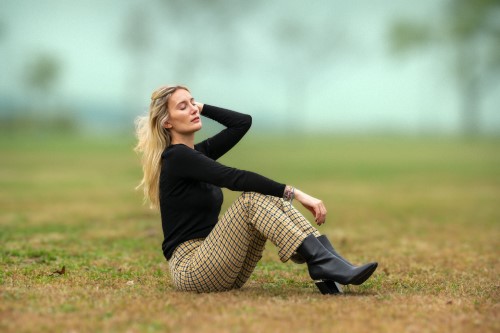
Step 4: Adjust the Blur Strength
You can adjust the strength of the blur by using the slider at the bottom of the panel. Take the blur strength all the way to the right-hand side to maximize the effect.
Step 5: Add Grain to Match the Subject
There may be noise in the image, especially in the subject. To match the noise in the subject with the blurred background, you can use the “Grain” slider. This slider compensates for the noise that was lost during the blurring process.
Step 6: Adjust the Tint
You can also adjust the tint of the image using the “Tint” option in the Neural Filters panel. This can help to create a specific mood or atmosphere in the photo.
Step 7: Fix Halos
In some cases, you may notice halos around the subject, especially in areas with highlights like hair. To fix this, duplicate the background layer and add a layer mask. Then, use the Rectangular Marquee tool to select the areas that need to be fixed. Add the layer mask and go to “Image” > “Apply Image.” Invert the image and use a soft brush with “Overlay” blending to paint over the halos.
Step 8: Add Haze
Finally, you can add a little bit of haze to the background by double-clicking on the “Smart Filter.” This can create an atmospheric effect and change the tone of the photo.
In conclusion, automatically blurring backgrounds in Photoshop is a quick and easy process, and can add a lot of impact to your photos. With the help of the Neural Filters feature, you can blur the background and keep the subject in focus, and adjust the blur strength and tint to create the perfect look for your photo.
►Download Sample Image for Practice: CLICK HERE
►Download PSD file: CLICK HERE
►SUBSCRIBE to my YouTube Channel: CLICK HERE
►JOIN or Become YouTube Member for Direct Downloads: CLICK HERE
►Support Me on Patreon for Instant Downloads: CLICK HERE