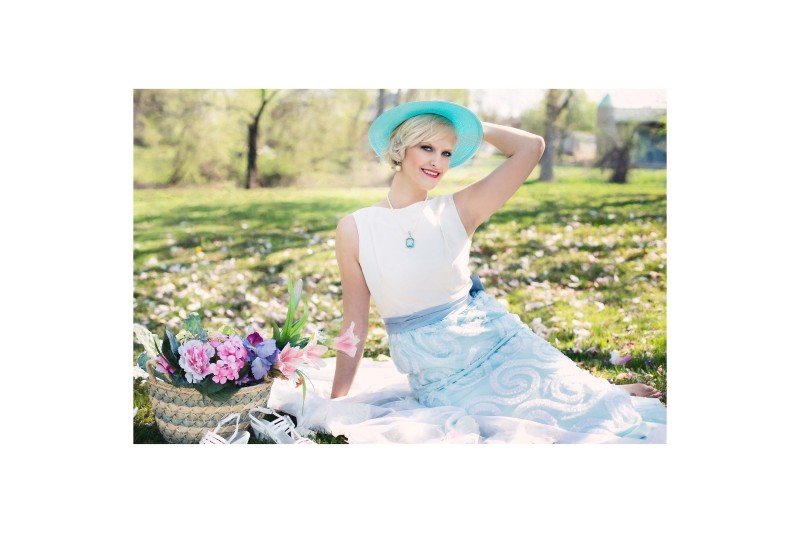
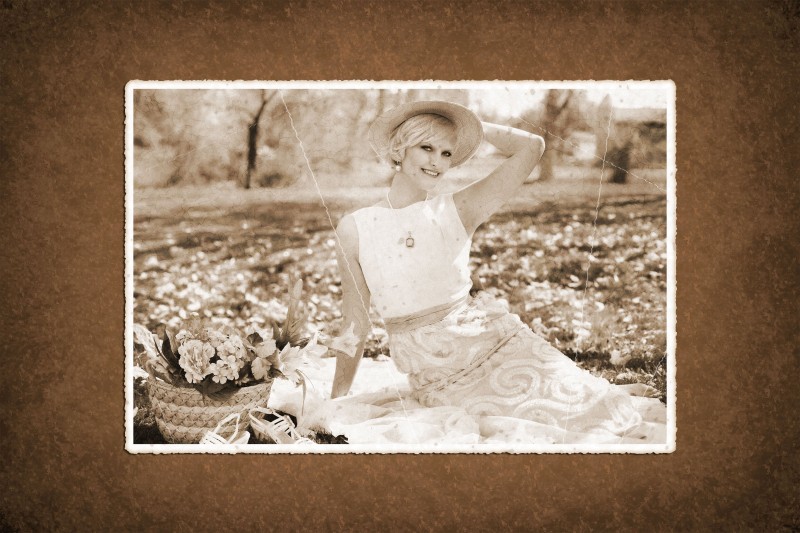
Create Old Photo Effect with Cracked Lines in Photoshop

In this photoshop photo manipulation effect, i will show you how to create Old Photo Effect with Realistic Paper Cracks & Broken Lines in photoshop.
Old Photo Effect Photoshop Tutorial:
CLICK HERE TO WATCH TUTORIAL
1
00:00:13
How to create old photo effect with realistic paper cracks and broken lines in Photoshop
2
00:00:24
First duplicate background layer (CTRL+J)
3
00:00:31
Change Name to Old Photo
4
00:00:40
Increase canvas size width: 150% and Height: 150%
5
00:00:58
Now load selection, CTRL + Click on layer thumbnail
6
00:01:10
goto select – modify – choose expand.
7
00:01:19
Expand selection by 30 pixels
8
00:01:33
goto channels panel and add new channel
9
00:01:42
Fill selection with white (SHIFT+F5)
10
00:01:50
Deselect the selection (CTRL+D)
11
00:01:57
Apply spatter filter to the alpha channel
12
00:02:05
Go to filer gallery and select spatter from drop down list
13
00:02:35
Keep spray radius: 13 & Smoothness: 7
14
00:02:44
Next apply sumi-e filter to alpha channel
15
00:02:59
Keep stroke width: 8, pressure: 15 & contrast: 40
16
00:03:16
and last add accented edges filter to alpha channel
17
00:03:32
Keep edge width: 3, brightness: 44 & smothness: 4
18
00:03:47
We will use this alpha channel to create edges for old photo
19
00:03:57
Now load selection, CTRL + Click on channel
thumbnail
20
00:04:08
go to layers panel and add new layer
21
00:04:16
change name to edges
22
00:04:23
Fill selection with white (SHIFT+F5)
23
00:04:35
move edge layer to below the old photo layer
24
00:04:53
Now we give photo a old vintage color
25
00:05:02
select hue/saturation adjustment with colorize
26
00:05:12
keep hue: 32 & saturation: 25
27
00:05:23
Now add noise to the old photo layer
28
00:05:43
keep distribution: uniform, amount : 4% with monochromatic
29
00:05:56
Add new blank layer and change name to cracks
30
00:06:16
Add clouds filter
31
00:06:29
then go to filter – pixelate – choose crystallize.
32
00:06:45
Keep cell size: 27 and click ok.
33
00:06:57
apply accented edges filter
34
00:07:08
keep edge width: 1, brightness: 0 & smoothness: 4
35
00:07:26
change layer blending to overlay and reduce opacity to 30%
36
00:07:55
load edge selection and mask the cracks effect
37
00:08:15
Add new layer and name it stains
38
00:08:33
Fill layer with white (SHIFT+F5)
39
00:08:46
goto filter gallery – apply sponge.
40
00:09:09
keep brush size: 10, definition: 25 & smoothness: 15
41
00:09:43
apply sponge filter again
42
00:10:23
now colorize stains layer with hue/saturation
43
00:10:41
keep hue: 32 & saturation: 25
44
00:10:54
change layer blending to multiply and reduce opacity to 70-80%
45
00:11:11
Add layer mask to the stains layer, to replace with existed mask hold ALT and drag the mask.
46
00:11:30
Now add layer styles to edge layer
47
00:11:35
Double click the layer to open the blending options window.
48
00:11:45
add bevel, inner glow & drop shadow styles to the layer
49
00:13:39
Now create broken lines on photograph
50
00:13:46
Load edge selection and add new layer, then fill with white
51
00:14:07
similarly create new layer and fill with black
52
00:14:33
now select transform selection and rotate it
53
00:14:48
Hold CTRl key and move left or right arrow key to make a gap
54
00:15:01
similarly create multiple lines
55
00:17:02
Now merge these two layers
56
00:17:10
Change layer name to broken lines
57
00:17:20
change layer blending to screen & reduce opacity
58
00:17:54
We can add any background to this old photo effect
59
00:18:13
That’s it. We’re done.
[sociallocker id=”1411″][download-attachments][/sociallocker]